Optimizing White Ink Textile Printing: Mesh Selection
Learn how choosing a mesh with the proper specs can save you headaches and money.
There are countless materials, chemicals, and processes involved in a successful screen print. However, at its core, the process involves mesh, emulsion, and ink, and these three are arguably the most important factors in producing a good print. In Textile printing, white ink is used more than all other colors combined, and is arguably the color that gives printers the most headaches. In this article, we will focus on the role of mesh selection in efficient and effective printing of white ink on textiles.
When it comes to selecting mesh, most printers will instinctively turn to industry typical mesh counts such as 86, 110, 156, 200, 230, and 305 threads per inch. Often, less attention is given to the thread diameter of the mesh. Finding the ideal balance between mesh count and thread diameter, however, can have a profound effect on your printing process.
Ideal Ink Deposit with High Fill-Rate/Low-Capacity mesh
The amount and finish of ink deposited on a substrate is critical because it determines the look (brightness) and feel (hand) of the garment. Some will recommend optimizing ink deposit by building up the stencil with more emulsion. This will result in a thicker deposit, but the ink will tend to be inconsistent—thicker on the edges of the open spaces, yet thinner in the middle.
In reality, the mesh itself should determine the ink deposit, not the emulsion or stencil thickness. Recognizing this, most mesh manufacturers publish theoretical ink volumes alongside mesh count and thread diameter specifications. While helpful as a reference, the problem is that real life ink deposit values can vary greatly from the specification because of different print parameters and ink properties.
Generally speaking, a thicker mesh will deposit more ink, but will also maximize hills and minimize the valleys. This creates poor matte down, poor opacity, and a rough surface. In addition, as mentioned above, the properties of the ink itself cannot be overlooked. The narrower columns in thicker mesh can make it harder for the ink to get through—especially tackier textile inks.
A different strategy, then, for obtaining an ideal ink deposit is utilizing a mesh specification with a high fill-rate, but low capacity. Essentially, this means to select a more open mesh with thinner threads. While this means reduced column height, it also means increased area between threads, which improves throughput even with very tacky inks (See Fig. B). A stencil made with this type of mesh can be quickly and fully filled with ink on the flood stroke, and then efficiently transfer the ink on the squeegee stroke. Fig. A below helps to explain the concept. The shorter, more open beaker on the left is like a mesh with a thinner thread and more open area. Compared to the taller beaker on the right, the shorter one can be both filled up and emptied faster.
 FIG. A: Beaker on left illustrates the increased open area of a mesh with a thinner thread
 FIG B: Increased open area of left mesh provides for greater ink throughput
Many printers, by defaulting to industry typical mesh specs, are unknowingly using the thickest threads. To compensate for the taller, narrower columns, they must slow their printing speed, increase their squeegee pressure, and use multiple passes to get the desired ink deposit. The tacky inks used in textile printing–white in particular–only make the situation worse, contributing to a garment with increased fibrillation, more surface flaws, and a rougher feel.
Choosing a mesh, then, with a similar thread count but thinner threads can provide more ink throughput, and thus help avoid these issues. Because less passes are required, it can also reduce ink use, resulting in real savings. As an example, a printer might choose 150-55 or even 150-45 mesh over 160-63. Table A below lists a selection of suggested mesh specifications with a higher ink throughput that give a truer to theoretical ink deposit than industry typical meshes.
| Industry Typical Specs | Recommended Thinner Thread Alternative | Extreme Open Area Alternative (experts only) |
|---|---|---|
| 110-80 | 100-71 | N/A |
| 125-71 | 135-55 | 120-55 |
| 160-63 | 150-55 or 150-48 | 150-45 |
| 200-55 | 200-48 | 200-45 |
| 230-48 | 230-45 | 230-40 |
| 305-40 | 305-35 or 280-35 | 305-30 |
TABLE A: Recommended alternative mesh specifications
A word of caution: Printers using this strategy of thin thread/large open area mesh will have to pay more attention to their screen stretching process and press settings in order to avoid popping screens.
Taking Minimum Dot Size into Account
Mesh opening and thread diameter affect not only ink deposit, but also the minimum dot size that can be printed in a halftone image. Mesh opening and thread diameter selection, therefore, should also be influenced by the minimum size of both positive and negative elements in the image.
For a positive or “highlight” dot, mesh can actually inhibit the print. Therefore, there must be enough open area that the mesh itself doesn’t interfere with the print. The dot in the top right of Fig. C below will print just fine, while the dot in the lower right will not print at all. To print a negative or “shadow” dot, there must be a sufficient number of threads present to anchor the emulsion, as in the top left dot in the illustration below. Otherwise, the dot itself will be lost, as you see in the bottom left of the graphic. The goal, then, is to have just enough threads per inch to support the needed stencil detail without interfering with the print.
 FIG C: Negative dots (left) and positive dots (right) on mesh
An important side note: The human eye is much better at gauging highlight dots than shadow dots. Bright colors tend to “jump out” at us while black and other dark colors are less noticeable. Therefore, when printing the more noticeable positive dots, once again a more open mesh is most effective
As you can see in Fig. D below, even with the same mesh count, a mesh with thinner threads (right side) provides more open area for the ink to transfer through, while maintaining the same number of supporting threads.
 FIG D: A mesh with thinner threads (right) compared to a standard spec (left)
The Role of Mesh Quality
An important caveat to this strategy is that with thinner threads, the meshes themselves will be more fragile. Rather than sacrificing the improved printability of these more open meshes for the “bulletproof” durability of the industry typical specifications, however, much of that fragility can be offset by choosing a higher quality mesh. Thin thread meshes with strong, high modulus threads and good warp/weft balance can help prolong screen life while still providing the benefits discussed above. What should you look for in a quality mesh?
First, look for a high modulus thread. A good modulus strength is 600 - 730 N/mm². Even better would be 730 - 790 N/mm², which is recommended for mesh with 33-45µm threads. An ideal modulus strength would be in the 790 - 850 N/mm² range, and is essential for mesh with very thin threads, e.g. less than 33µm.
Second, you’ll want a mesh with good warp/weft balance. This will ensure that the mesh openings stay square when stretched, minimizing moiré and improving dimensional accuracy. You can check the balance of stretched mesh by using a mesh counter in both the warp and weft directions. Mesh will typically elongate by about 3-6% when stretched, meaning a 305 mesh may only register at 290 threads per inch after being tensioned. However, a well-balanced mesh will maintain a similar thread count in both directions.
In short, choose a mesh that uses strong thread, is consistently woven, and optimally heat-set. Ensure that the manufacturer includes tolerances for both warp and weft mesh count as well as mesh thickness in their specifications. Since there may be slight variations between rolls of even the same specification mesh, look for a manufacturer that includes an inspection tag with each roll. This should provide actual specifications in addition to catalog values, as seen in Fig. E
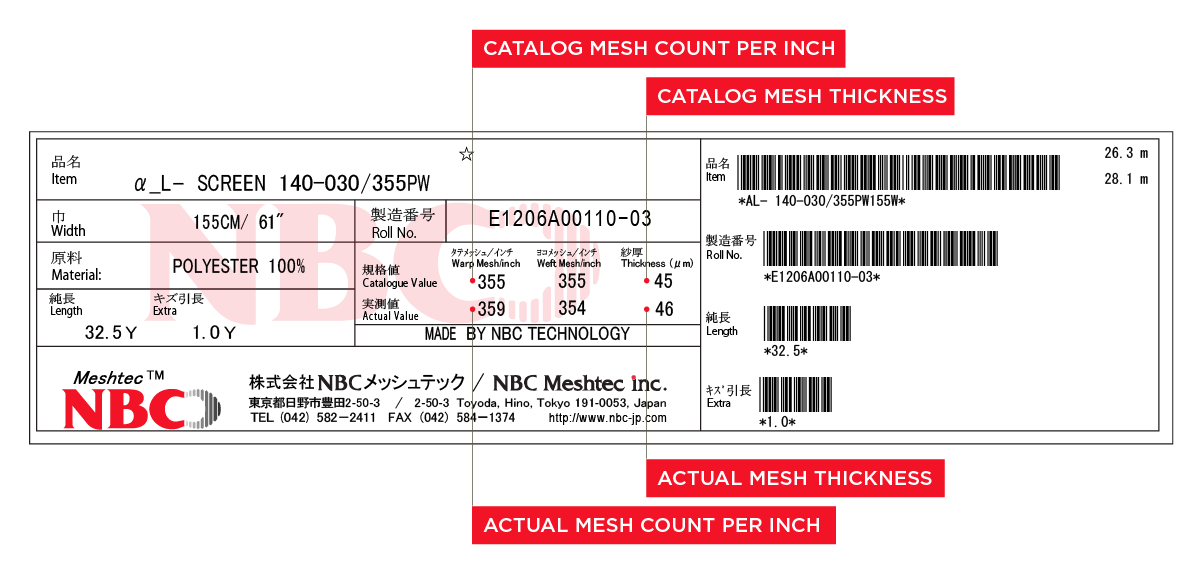 FIG E: A mesh inspection tag that displays both catalog (bottom) and real (top) values
Putting It into Practice
Utilizing a mesh specification with thinner threads than the industry typical standards may require some adjustments to your print process. However, the increased printability and quality it delivers can more than make up for the time and effort involved. If you find that your current mesh supplier can’t deliver the high-strength, consistent mesh this method requires, why not contact NBC Meshtec Americas at (800) 235-5056, or visit our team page to find the Technical Sales Representative for your area. They will be glad to provide a tailored recommendation of a mesh and thread that will work for your particular application.
Downloadable Resources
For More Information…

The technical information presented in this guide was taken from the article Screens Matter by the late Joe Clarke. Joe Clarke had decades of experience in both the research and management sides of the screen printing industry. He was a member of The Academy of Screen and Digital Printing Technologies, as well as a Specialty Graphic Imaging Association fellow.
For a more detailed technical explanation of the concepts presented in this guide, download Screens Matter.